PART I
準備工作
PART II
瞭解Windows 10安裝過程
PART III 製作自動安裝回應檔案
PART IV
如何使用
PART V
關閉[SMB 1.0/CIFS 檔案共用支援]功能
PART VI
使用DiskPart建立磁碟分割
PART VII
不要預留[保留的儲存空間]
PART VIII
指定電腦名稱與加入網域
PART IX
彈性搭配批次檔使用
PART Max
懶人包
瞭解了安裝Windows 10時在各階段需要做的事情, 接下來回到在
Part I安裝好的Windows系統映像管理員. 類別目錄檔產生後就可以開始建立回應檔案.
展開左下角Windows 映像裡面的Components, 因為是要製作給64位元的Windows 10安裝用, 記得要選取amd64開頭的元件, 而非wow64或是x86開頭的.
首先針對[windowsPE]階段要處理的事項:
- 選擇語言, 時間貨幣格式, 鍵盤輸入法
- 輸入產品金鑰
- 選取作業系統版本
- 接受授權條款
- 配置並選取安裝Windows的磁碟空間
[
選擇語言, 時間貨幣格式, 鍵盤輸入法]
在Components處找尋[
amd64_Microsoft-Windows-International-Core-WinPE]
按滑鼠右鍵選擇[將設定新增至 Pass 1 windowsPE]
按照下圖在右邊的內容設定中輸入相關的設定值:
[
接受授權條款]
[
輸入產品金鑰]
在Components處找尋[
amd64_Microsoft-Windows-Setup], 選取並展開
在[UserData]底下的[ProductKey]上按滑鼠右鍵選擇[將設定新增至 Pass 1 windowsPE]
按照下圖在右邊的內容設定中輸入相關的設定值:
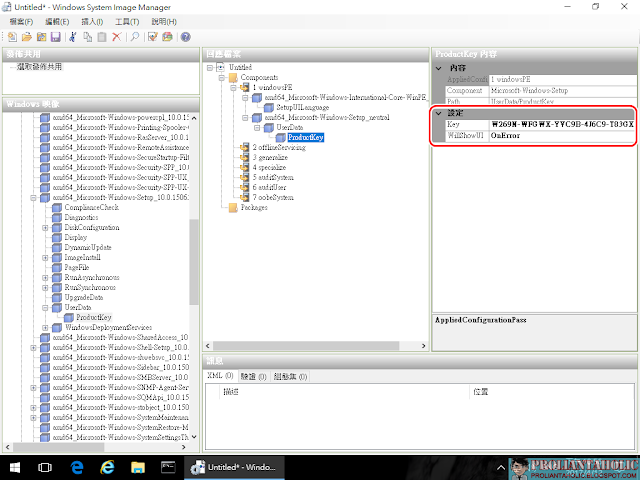 |
| 自動安裝回應檔案裡面如果沒有產品金鑰會安裝失敗, 所以先使用Windows 10專業版[KMS用戶端安裝識別碼, KMS Client Setup Keys]來安裝 |
[
配置並選取安裝Windows的磁碟空間]
在Components處找尋[
amd64_Microsoft-Windows-Setup], 選取並展開
在[DiskConfiguration]上按滑鼠右鍵選擇[將設定新增至 Pass 1 windowsPE]
在[DiskConfiguration]上按滑鼠右鍵選擇[插入新的Disk]
[CreatePartitions]跟[ModifyPartitions]也比照辦理. (各新增兩個)
依照我測試的結果, 手動安裝Windows時, 安裝程式會建立兩個partitions.
第一個partition是500 MB, 第二個partition則是用掉剩餘空間.
按照下圖在右邊的內容設定中輸入相關的設定值:
[
選取作業系統版本]
在Components處找尋[
amd64_Microsoft-Windows-Setup], 選取並展開
在[ImageInstall]底下的[OSImage]上按滑鼠右鍵選擇[將設定新增至 Pass 1 windowsPE]
在[InstallFrom]上按滑鼠右鍵選擇[插入新的MetaData]
在[Credentials]上按滑鼠右鍵選擇[刪除]
按照下圖在右邊的內容設定中輸入相關的設定值:
在[選取作業系統版本]裡面用到的/IMAGE/DISPLAYNAME有很多方法可以獲得, 列舉其中一些:
* Windows安裝程式中所顯示的
* 用DISM查看install.wim (例如: Dism /Get-ImageInfo /ImageFile:C:\install.wim)
* 用Windows系統映像管理員打開install.wim時所顯示的
進行到這裡[
windowsPE]階段的設定已經完成, 先儲存並驗證回應檔案有無錯誤, 將檔案名稱設定為
autounattend.xml
此時的
autounattend.xml應該類似這樣:
1
2
3
4
5
6
7
8
9
10
11
12
13
14
15
16
17
18
19
20
21
22
23
24
25
26
27
28
29
30
31
32
33
34
35
36
37
38
39
40
41
42
43
44
45
46
47
48
49
50
51
52
53
54
55
56
57
58
59
60
61
62
63
64
65
66
67
68
69
70
71
| <?xml version="1.0" encoding="utf-8"?>
<unattend xmlns="urn:schemas-microsoft-com:unattend">
<!-- By Proliantaholic https://proliantaholic.blogspot.com -->
<settings pass="windowsPE">
<component name="Microsoft-Windows-International-Core-WinPE" processorArchitecture="amd64" publicKeyToken="31bf3856ad364e35" language="neutral" versionScope="nonSxS" xmlns:wcm="http://schemas.microsoft.com/WMIConfig/2002/State" xmlns:xsi="http://www.w3.org/2001/XMLSchema-instance">
<SetupUILanguage>
<UILanguage>zh-TW</UILanguage>
</SetupUILanguage>
<InputLocale>zh-TW</InputLocale>
<SystemLocale>zh-TW</SystemLocale>
<UILanguage>zh-TW</UILanguage>
</component>
<component name="Microsoft-Windows-Setup" processorArchitecture="amd64" publicKeyToken="31bf3856ad364e35" language="neutral" versionScope="nonSxS" xmlns:wcm="http://schemas.microsoft.com/WMIConfig/2002/State" xmlns:xsi="http://www.w3.org/2001/XMLSchema-instance">
<UserData>
<ProductKey>
<Key>W269N-WFGWX-YVC9B-4J6C9-T83GX</Key>
<WillShowUI>OnError</WillShowUI>
</ProductKey>
<AcceptEula>true</AcceptEula>
</UserData>
<DiskConfiguration>
<Disk wcm:action="add">
<CreatePartitions>
<CreatePartition wcm:action="add">
<Order>1</Order>
<Size>500</Size>
<Type>Primary</Type>
</CreatePartition>
<CreatePartition wcm:action="add">
<Extend>true</Extend>
<Order>2</Order>
<Type>Primary</Type>
</CreatePartition>
</CreatePartitions>
<ModifyPartitions>
<ModifyPartition wcm:action="add">
<Active>true</Active>
<Format>NTFS</Format>
<Label>系統保留</Label>
<Order>1</Order>
<PartitionID>1</PartitionID>
</ModifyPartition>
<ModifyPartition wcm:action="add">
<Format>NTFS</Format>
<Letter>C</Letter>
<Order>2</Order>
<PartitionID>2</PartitionID>
</ModifyPartition>
</ModifyPartitions>
<DiskID>0</DiskID>
<WillWipeDisk>true</WillWipeDisk>
</Disk>
<WillShowUI>OnError</WillShowUI>
</DiskConfiguration>
<ImageInstall>
<OSImage>
<InstallFrom>
<MetaData wcm:action="add">
<Key>/IMAGE/DISPLAYNAME</Key>
<Value>Windows 10 Pro</Value>
</MetaData>
</InstallFrom>
<InstallTo>
<DiskID>0</DiskID>
<PartitionID>2</PartitionID>
</InstallTo>
</OSImage>
</ImageInstall>
</component>
</settings>
</unattend>
|
建議可以先依照
PART IV的方法測試看看有沒有問題後再繼續, 如果一切正常的話, Windows 10安裝程式應該會停在這個畫面:
再來處理[oobeSystem]階段:
- 選擇區域
- 選擇鍵盤配置
- 設定帳號 (本地帳號)
- 新增使用者
- 建立密碼
- 隱私設定
[
選擇區域]
[
選擇鍵盤配置]
在Components處找尋[
amd64_Microsoft-Windows-International-Core]
按滑鼠右鍵選擇[將設定新增至 Pass 7 oobeSystem]
按照下圖在右邊的內容設定中輸入相關的設定值:
[
設定帳號 (本地帳號)]
[
新增使用者]
[
建立密碼]
在Components處找尋[
amd64_Microsoft-Windows-Shell-Setup], 選取並展開
在[UserAccounts]底下的[LocalAccounts]上按滑鼠右鍵選擇[將設定新增至 Pass 7 oobeSystem]
在[LocalAccounts]上按滑鼠右鍵選擇[插入新的LocalAccount]
按照下圖在右邊的內容設定中輸入相關的設定值:
這樣會新增一個名為admin的帳號, 屬於Administrators群組, 密碼是password
在輸入密碼前先點選[工具], 看看[隱藏敏感資料]是否有打勾, 這樣才不會將密碼以明碼方式寫入回應檔案.
儲存回應檔案時密碼就會被編碼, 下次再用Windows系統映像管理員打開時就部會看到明碼了.
[
隱私設定]
在Components處找尋[
amd64_Microsoft-Windows-Shell-Setup], 選取並展開
在[OOBE]上按滑鼠右鍵選擇[將設定新增至 Pass 7 oobeSystem]
按照下圖在右邊的內容設定中輸入相關的設定值:
在[VMModeOptimizations]上按滑鼠右鍵選擇[刪除]
我不喜歡[隱私設定][位置]那類資訊預設都是開啟, 所以我把[ProtectYourPC]設定為3, 預設值應該是1.
驗證回應檔案, 儲存回應檔案(
autounattend.xml), 製作自動安裝回應檔案完成.
參考資料:
繼續閱讀:
PART IV 如何使用


