顯示具有 Windows 標籤的文章。 顯示所有文章

2021年10月10日

跳過安裝Windows 11時的硬體需求檢查

注意:

  • 微軟並不建議將Windows 11安裝在不符合最低系統需求的裝置上, 您必須自行承擔修改後安裝使用的風險.
  • 本篇主要適用於全新安裝Windows 11, 如果您是要從Windows 10升級安裝到Windows 11, 請參考 安裝Windows11的方法 內的方法.


微軟新推出的Windows 11提高了對系統硬體規格的需求.
如果想在不符合最低系統需求的裝置上安裝Windows 11, 可以透過修改註冊機碼來達成.
我寫了一個批次檔配合Windows 11的自動安裝回應檔案, 省去需要按Shift+F10後手動修改註冊機碼等動作.
也不需修改原有的boot.wim, 只需要照著原有的程序進行安裝即可.


準備工作:


使用方法:

 如果您的安裝媒體可以寫入, 例如USB隨身碟; 或是您知道如何編修ISO檔案:

  • 請把autounattend.xml, bypass.cmd兩個檔案複製到跟setup.exe同一個目錄內. (安裝媒體的根目錄)
  • 然後使用含有這兩個檔案的安裝媒體開機進行安裝Windows 11.


如果您的安裝媒體不可以寫入, 例如燒錄好的DVD; 或是您不想更動ISO檔案的內容:

  • 請把autounattend.xml, bypass.cmd兩個檔案複製到另外準備的一個USB隨身碟內的根目錄.
  • 如果使用虛擬機安裝的話, 可以把autounattend.xml, bypass.cmd兩個檔案放在virtual floppy或是另一個ISO檔案內(Virtual CD/DVD).
  • 使用此方法安裝時, 請確定有那兩個檔案的USB隨身碟/virtual floppy/Virtual CD/DVD在開機時是安裝程式可以存取到的.
  • 然後使用原有未修改的安裝媒體開機進行安裝Windows 11.


有在下列配備的虛擬機測試過可以順利安裝:

  • 2-Core CPU/2GB RAM/30GB HDD/BIOS legacy mode/No TPM
  • Windows 11 專業版 (繁體中文) 21H2 64位元版 (OS 組建 22000.194)


開機後Windows 11的安裝程式會搜尋到autounattend.xml, 然後就會執行bypass.cmd進行所需註冊機碼修改. 接下來就按照指示安裝Windows 11即可.

bypass.cmd會修改註冊機碼跳過下列硬體需求檢查(不包含CPU):

  • RAM
  • Secure Boot
  • Storage
  • TPM
  • UEFI

Windows 11需求請參考: 微軟網站.


autounattend.xml

<?xml version="1.0" encoding="utf-8"?>
<unattend xmlns="urn:schemas-microsoft-com:unattend">
<!-- By Proliantaholic https://proliantaholic.blogspot.com -->
    <settings pass="windowsPE">
        <component name="Microsoft-Windows-Setup" processorArchitecture="amd64" publicKeyToken="31bf3856ad364e35" language="neutral" versionScope="nonSxS" xmlns:wcm="http://schemas.microsoft.com/WMIConfig/2002/State" xmlns:xsi="http://www.w3.org/2001/XMLSchema-instance">
            <RunSynchronous>
                <RunSynchronousCommand wcm:action="add">
                    <Order>1</Order>
                    <Path>cmd /c for %a in (A B C D E F G H I J K L M N O P Q R S T U V W X Y Z) do @if exist %a:\bypass.cmd (%a:\bypass.cmd)</Path>
                    <Description>Find and execute bypass.cmd</Description>
                </RunSynchronousCommand>
            </RunSynchronous>
            <UserData>
                <ProductKey>
                    <WillShowUI>Always</WillShowUI>
                </ProductKey>
            </UserData>
        </component>
    </settings>
</unattend>

bypass.cmd

@echo off
REM ###########################################################
REM #  By Proliantaholic https://proliantaholic.blogspot.com  #
REM ###########################################################

setlocal EnableDelayedExpansion
REM Bypass Windows 11 RAM/SecureBoot/Storage/TPM/UEFI requirements check
for /f "tokens=2*" %%a in ('reg query HKLM\System\CurrentControlSet\Control /v PEFirmwareType') do set "FirmwareType=%%b"
for /F "tokens=2*" %%a in ('reg query "HKEY_LOCAL_MACHINE\SOFTWARE\Microsoft\Windows NT\CurrentVersion" /v CurrentBuildNumber') do set "CurrentBuildNumber=%%~b"
if "!CurrentBuildNumber!" GEQ "22000" (
    Echo Bypassing Windows 11 [22000 and later] RAM/SecureBoot/Storage/TPM/UEFI check...
    Echo.
    Echo | set /p "Dummy=Add BypassRAMCheck...        "
    reg add "HKLM\SYSTEM\Setup\LabConfig" /v BypassRAMCheck /t REG_DWORD /d 1 /f
    Echo | set /p "Dummy=Add BypassSecureBootCheck... "
    reg add "HKLM\SYSTEM\Setup\LabConfig" /v BypassSecureBootCheck /t REG_DWORD /d 1 /f
    Echo | set /p "Dummy=Add BypassStorageCheck...    "
    reg add "HKLM\SYSTEM\Setup\LabConfig" /v BypassStorageCheck /t REG_DWORD /d 1 /f
    Echo | set /p "Dummy=Add BypassTPMCheck...        "
    reg add "HKLM\SYSTEM\Setup\LabConfig" /v BypassTPMCheck /t REG_DWORD /d 1 /f
    if "!FirmwareType!" EQU "0x1" (Echo | set /p "Dummy=Add BypassUEFICheck...       "& reg add "HKLM\SYSTEM\Setup\LabConfig" /v BypassUEFICheck /t REG_DWORD /d 1 /f)
)
Echo.
Echo Done.
REM Pause for 10 seconds
Echo WScript.Sleep 10000 > %TEMP%\sleep.vbs
cscript //nologo %TEMP%\sleep.vbs


推薦閱讀:


2021年8月26日

如何關閉Microsoft Edge新索引標籤裡的天氣資訊 How to turn off weather in new tab page in Microsoft Edge

每次在Microsoft Edge裡開啟新索引標籤時, 頁面左上角都會有個天氣圖示和溫度.
如果你有用帳號登入, 那就可以在右方的[頁面設定]裡關掉它. ([自訂] -> [顯示問候語])


但是顯示問候語這個選項在沒使用帳號登入時是不會出現的, 接下來就看看如何在不登入的狀況下關掉新索引標籤裡的天氣資訊.


準備工作:
如果你從未改動過Microsoft Edge的設定, 建議先進入[頁面設定](頁面右上方的小齒輪), 到[自訂]中變更一下[背景]的設定.
確定有改成跟原來不一樣的設定後即可以改回你真正想要的設定, 此舉只是要讓Microsoft Edge把設定的參數寫入設定檔中,
免得下面的步驟要修改時會找不到選項參數.


步驟1:
修改前要徹底關閉Microsoft Edge, 這樣修改設定檔時才不會被覆寫成原來的值.
taskkill /F /IM msedge.exe


步驟2:
用[記事本]或是你喜歡的文字編輯器打開Microsoft Edge的設定檔: (檔名是Preferences, 如果擔心修改時出錯, 請先備份檔案)
通常是位於:
C:\Users\[使用者名稱]\AppData\Local\Microsoft\Edge\User Data\Default

或是在[開始]圖示上按滑鼠右鍵選擇[執行], 填入:
%LOCALAPPDATA%\Microsoft\Edge\User Data\Default\Preferences
然後選擇用[記事本]或是你喜歡的文字編輯器開啟.


步驟3:
[編輯] -> [尋找]
"show_greeting":true,
改為
"show_greeting":false,
修改完成後儲存檔案離開.


修改前:


修改完成後:


懶得一步一步修改的人, 可以用下面的PowerShell script: (上面的[準備工作]還是要做一下)

###########################################################
#  By Proliantaholic https://proliantaholic.blogspot.com  #
###########################################################

# Elevate Powershell to Admin
if (!([Security.Principal.WindowsPrincipal][Security.Principal.WindowsIdentity]::GetCurrent()).IsInRole([Security.Principal.WindowsBuiltInRole] "Administrator")) {
    Start-Process powershell.exe "-NoProfile -ExecutionPolicy Bypass -File `"$PSCommandPath`"" -Verb RunAs; exit
}

# Close all Microsoft Edge instances
Write-Host Closing all Microsoft Edge running instances... 
taskkill /F /IM msedge.exe > $null 2>&1
Write-Host Done.

# Test and set show_greeting to false
if ([regex]::Match($(Get-Content -Path "$Env:LOCALAPPDATA\Microsoft\Edge\User Data\Default\Preferences" -Encoding UTF8 -Raw), '(?s)("show_greeting":.*,)"show_').success) {
    if ([regex]::Match($(Get-Content -Path "$Env:LOCALAPPDATA\Microsoft\Edge\User Data\Default\Preferences" -Encoding UTF8 -Raw), '(?s)("show_greeting":true,)').success) {
        ((Get-Content -Path "$Env:LOCALAPPDATA\Microsoft\Edge\User Data\Default\Preferences" -Encoding UTF8 -Raw) -replace '"show_greeting":true,' , '"show_greeting":false,') | Set-Content -Path "$Env:LOCALAPPDATA\Microsoft\Edge\User Data\Default\Preferences" -Encoding UTF8
    }
    Write-Host
    Write-Host '"show_greeting":false,'
    Write-Host
} else {
    Write-Host
    Write-Host show_greeting NOT FOUND
    Write-Host
}

pause

2021年7月5日

如何幫VMware Workstation虛擬機新增虛擬信賴平台模組裝置(TPM)

注意: 

WMware Workstation版本16.2.0起, 有新的方法可以增加software TPM.

請看最後面的補充.


一般虛擬機預設沒有Trusted Platform Module (TPM) 信賴平台模組, 執行TPM.msc時會看到像這樣:


在新增虛擬信賴平台模組裝置之前, 要先Enable secure boot, 並且把虛擬機加密.


如果虛擬機內已經有安裝了Windows系統, 會需要一點時間來加密虛擬機.


虛擬機加密完成後, 新增Trusted Platform Module (TPM) 信賴平台模組裝置:


TPM新增完成後進入Windows系統內, 執行TPM.msc就可以看到有TPM可以使用了: 


2021/10/18 補充:
WMware Workstation自版本16.2.0起, 可以新增"software"的TPM, 方法如下:
  • 新增一台虛擬機後先關掉WMware Workstation
  • 用文字編輯器打開該虛擬機的.vmx檔案
  • 在檔案最後新增一行: managedvm.autoAddVTPM = "software"
  • 存檔後離開, 重新開啟WMware Workstation, 該虛擬機就會有TPM
  • 此方法就不需要像之前要先Enable secure boot, 把虛擬機加密跟輸入密碼了
編輯.vmx檔案:


虛擬機硬體在編輯.vmx檔案前後的對照:

如果安裝完Windows後在TPM管理內的狀態欄看到:
TPM維護工作仍在執行中。請稍後候幾分鐘,然後再重新整理此頁面以查看更新狀態。

可以點選[清除TPM], 重啟系統後應該就會變成: TPM已可以使用.


2021年5月31日

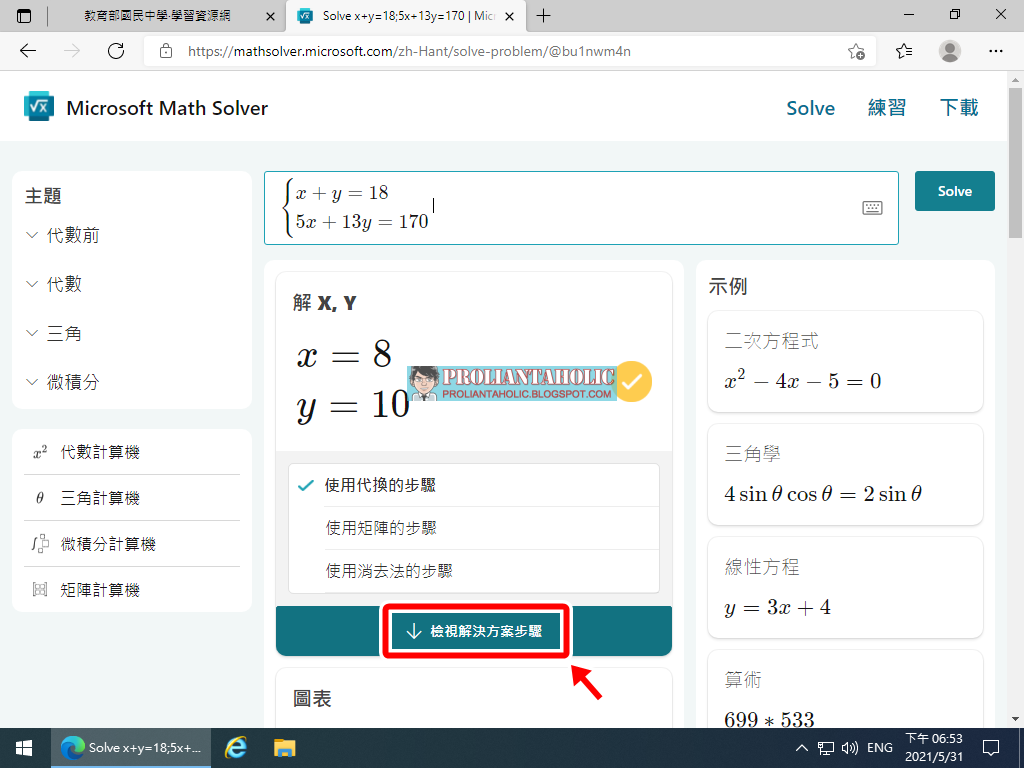
數學求解器 (Math Solver) - Microsoft Edge 版本91新增的小工具

Microsoft Edge從版本91起多了一個小工具: 數學求解器 (Math Solver)
如果你在家學習的小朋友問到你已經還給老師的數學題時, 可以用這個小工具解看看.
(在Microsoft Edge 版本91.0.864.37時, 這個工具還是預覽版)

可以框選螢幕上的數學題目, 或是手動輸入題目.
解開後可以開一個新的tab觀看, 也可以檢視解法的步驟.
另外也會根據題目的內容列出相關影片, 還有類似的題目供參考.


2020年9月20日

Windows 10 安裝[舊版][新倉頡][新速成]中文輸入法 (Windows 11適用)

微軟從Windows 10 版本2004 (20H1)開始推出新的中文輸入法, 有些軟體還不能完全相容.

如果想要用以前版本的新倉頡或是新速成輸入法, 需要動點手腳才能安裝.

所需的步驟要改好些地方(設定, 註冊機碼...), 我把它寫成一個PowerShell檔, 只要執行就可以設定安裝舊版的新倉頡跟新速成輸入法.

目前在Windows 10 22H2 19045.x / Windows 11 22H2 22621.x上測試都還可以用, 至於以後更新版的Windows推出後還能不能繼續這樣用就不知了.

使用方法:

  • 下載檔案 AddNewIME.ps1
  • 至少要安裝[微軟注音]輸入法
  • 在[AddNewIME.ps1]檔案上按滑鼠右鍵選[用 PowerShell 執行]即可


有安裝測試過的版本:
Windows 11 專業版 (繁體中文) 64位元版

  • 版本 22H2
  • 版本 21H2

Windows 10 專業版 (繁體中文) 64位元版

  • 版本 22H2
  • 版本 21H2
  • 版本 21H1
  • 版本 20H2
  • 版本 2004/20H1
  • 版本 1909/19H2
  • 版本 1903/19H1
  • 版本 1809/RS5


2020/12/01 補充:

如果要在繁中語系裡面像以前一樣有US鍵盤: (不太建議這樣使用)

  • 下載檔案 AddNewIMEandQWERTY.ps1
  • 在[AddNewIMEandQWERTY.ps1]檔案上按滑鼠右鍵選[用 PowerShell 執行]即可 


2020年6月15日

Windows Terminal 設定

Windows Terminal剛裝好時大概長這樣, 內容會因為你裝的東西有些不同:


點開設定可以看到settings.json大概長這樣:
 1
 2
 3
 4
 5
 6
 7
 8
 9
10
11
12
13
14
15
16
17
18
19
20
21
22
23
24
25
26
27
28
29
30
31
32
33
34
35
36
37
38
39
40
41
42
43
44
45
46
47
48
49
50
51
52
53
54
55
56
57
58
59
60
61
62
63
64
65
66
67
68
69
70
71
72
73
74
75
76
77
78
79
80
81
82
83
84
85
86
87
88
89
90
91
92
93
// This file was initially generated by Windows Terminal 1.0.1401.0
// It should still be usable in newer versions, but newer versions might have additional
// settings, help text, or changes that you will not see unless you clear this file
// and let us generate a new one for you.

// To view the default settings, hold "alt" while clicking on the "Settings" button.
// For documentation on these settings, see: https://aka.ms/terminal-documentation
{
    "$schema": "https://aka.ms/terminal-profiles-schema",

    "defaultProfile": "{574e775e-4f2a-5b96-ac1e-a2962a402336}",

    // You can add more global application settings here.
    // To learn more about global settings, visit https://aka.ms/terminal-global-settings

    // If enabled, selections are automatically copied to your clipboard.
    "copyOnSelect": false,

    // If enabled, formatted data is also copied to your clipboard
    "copyFormatting": false,

    // A profile specifies a command to execute paired with information about how it should look and feel.
    // Each one of them will appear in the 'New Tab' dropdown,
    //   and can be invoked from the commandline with `wt.exe -p xxx`
    // To learn more about profiles, visit https://aka.ms/terminal-profile-settings
    "profiles":
    {
        "defaults":
        {
            // Put settings here that you want to apply to all profiles.
        },
        "list":
        [
            {
                // Make changes here to the powershell.exe profile.
                "guid": "{61c54bbd-c2c6-5271-96e7-009a87ff44bf}",
                "name": "Windows PowerShell",
                "commandline": "powershell.exe",
                "hidden": false
            },
            {
                // Make changes here to the cmd.exe profile.
                "guid": "{0caa0dad-35be-5f56-a8ff-afceeeaa6101}",
                "name": "命令提示字元",
                "commandline": "cmd.exe",
                "hidden": false
            },
            {
                "guid": "{574e775e-4f2a-5b96-ac1e-a2962a402336}",
                "hidden": false,
                "name": "PowerShell",
                "source": "Windows.Terminal.PowershellCore"
            },
            {
                "guid": "{b453ae62-4e3d-5e58-b989-0a998ec441b8}",
                "hidden": false,
                "name": "Azure Cloud Shell",
                "source": "Windows.Terminal.Azure"
            },
            {
                "guid": "{07b52e3e-de2c-5db4-bd2d-ba144ed6c273}",
                "hidden": false,
                "name": "Ubuntu-20.04",
                "source": "Windows.Terminal.Wsl"
            }
        ]
    },

    // Add custom color schemes to this array.
    // To learn more about color schemes, visit https://aka.ms/terminal-color-schemes
    "schemes": [],

    // Add custom keybindings to this array.
    // To unbind a key combination from your defaults.json, set the command to "unbound".
    // To learn more about keybindings, visit https://aka.ms/terminal-keybindings
    "keybindings":
    [
        // Copy and paste are bound to Ctrl+Shift+C and Ctrl+Shift+V in your defaults.json.
        // These two lines additionally bind them to Ctrl+C and Ctrl+V.
        // To learn more about selection, visit https://aka.ms/terminal-selection
        { "command": {"action": "copy", "singleLine": false }, "keys": "ctrl+c" },
        { "command": "paste", "keys": "ctrl+v" },

        // Press Ctrl+Shift+F to open the search box
        { "command": "find", "keys": "ctrl+shift+f" },

        // Press Alt+Shift+D to open a new pane.
        // - "split": "auto" makes this pane open in the direction that provides the most surface area.
        // - "splitMode": "duplicate" makes the new pane use the focused pane's profile.
        // To learn more about panes, visit https://aka.ms/terminal-panes
        { "command": { "action": "splitPane", "split": "auto", "splitMode": "duplicate" }, "keys": "alt+shift+d" }
    ]
}

可以使用的選項是Windows Terminal根據系統內有安裝的東西自動產生的, 每一項會對應到一個"profile", 以"guid"當作獨特的識別


由"defaultProfile"的"guid"可以看出預設開啟的是"PowerShell",
如果想改成預設開啟"命令提示字元", 把"defaultProfile"的"guid"改為"{0caa0dad-35be-5f56-a8ff-afceeeaa6101}"即可

因為profile是Windows Terminal自動產生的, 如果有些選項不想用, 不能直接刪掉某個profile(會再產生回來), 要把"hidden"改為true, 至於porfile的順序則可以自己調動

以下是修改了:
  • 預設開啟"命令提示字元", 並把選項順序改到最上面
  • 不顯示"Azure Cloud Shell"


如果要修改Windows Terminal的色彩配置, 可以加在:
  • "defaults": 所有的profiles都會套用
  • 個別profile: 僅該profile會套用
以下是修改了:
  • "命令提示字元" profile: 使用Windows Terminal內建的"One Half Light"色彩配置, 並開啟壓克力效果


Windows Terminal內建的色彩配置有:
  • Campbell
  • Campbell Powershell
  • Vintage
  • One Half Dark
  • One Half Light
  • Solarized Dark
  • Solarized Light
  • Tango Dark
  • Tango Light

色彩配置的內容及效果請參考:
https://docs.microsoft.com/zh-tw/windows/terminal/customize-settings/color-schemes

加上 startingDirectory 可以設定起始目錄:


修改過的settings.json:
 1
 2
 3
 4
 5
 6
 7
 8
 9
10
11
12
13
14
15
16
17
18
19
20
21
22
23
24
25
26
27
28
29
30
31
32
33
34
35
36
37
38
39
40
41
42
43
44
45
46
47
48
49
50
51
52
53
54
55
56
57
58
59
60
61
62
63
64
65
66
67
68
69
70
71
72
73
74
75
76
77
78
79
80
81
82
83
84
85
86
87
88
89
90
91
92
93
94
95
96
// This file was initially generated by Windows Terminal 1.0.1401.0
// It should still be usable in newer versions, but newer versions might have additional
// settings, help text, or changes that you will not see unless you clear this file
// and let us generate a new one for you.

// To view the default settings, hold "alt" while clicking on the "Settings" button.
// For documentation on these settings, see: https://aka.ms/terminal-documentation
{
    "$schema": "https://aka.ms/terminal-profiles-schema",

    "defaultProfile": "{0caa0dad-35be-5f56-a8ff-afceeeaa6101}",

    // You can add more global application settings here.
    // To learn more about global settings, visit https://aka.ms/terminal-global-settings

    // If enabled, selections are automatically copied to your clipboard.
    "copyOnSelect": false,

    // If enabled, formatted data is also copied to your clipboard
    "copyFormatting": false,

    // A profile specifies a command to execute paired with information about how it should look and feel.
    // Each one of them will appear in the 'New Tab' dropdown,
    //   and can be invoked from the commandline with `wt.exe -p xxx`
    // To learn more about profiles, visit https://aka.ms/terminal-profile-settings
    "profiles":
    {
        "defaults":
        {
            // Put settings here that you want to apply to all profiles. (如果要所有的profiles都套用就加在這下面)
        },
        "list":
        [
            {
                // Make changes here to the cmd.exe profile.
                "guid": "{0caa0dad-35be-5f56-a8ff-afceeeaa6101}",
                "name": "命令提示字元",
                "commandline": "cmd.exe",
                "colorScheme": "One Half Light",
                "useAcrylic": true,
                "startingDirectory": "%USERPROFILE%\\Desktop",
                "hidden": false
            },
            {
                // Make changes here to the powershell.exe profile.
                "guid": "{61c54bbd-c2c6-5271-96e7-009a87ff44bf}",
                "name": "Windows PowerShell",
                "commandline": "powershell.exe",
                "hidden": false
            },
            {
                "guid": "{574e775e-4f2a-5b96-ac1e-a2962a402336}",
                "hidden": false,
                "name": "PowerShell",
                "source": "Windows.Terminal.PowershellCore"
            },
            {
                "guid": "{b453ae62-4e3d-5e58-b989-0a998ec441b8}",
                "hidden": true,
                "name": "Azure Cloud Shell",
                "source": "Windows.Terminal.Azure"
            },
            {
                "guid": "{07b52e3e-de2c-5db4-bd2d-ba144ed6c273}",
                "hidden": false,
                "name": "Ubuntu-20.04",
                "source": "Windows.Terminal.Wsl"
            }
        ]
    },

    // Add custom color schemes to this array.
    // To learn more about color schemes, visit https://aka.ms/terminal-color-schemes
    "schemes": [],

    // Add custom keybindings to this array.
    // To unbind a key combination from your defaults.json, set the command to "unbound".
    // To learn more about keybindings, visit https://aka.ms/terminal-keybindings
    "keybindings":
    [
        // Copy and paste are bound to Ctrl+Shift+C and Ctrl+Shift+V in your defaults.json.
        // These two lines additionally bind them to Ctrl+C and Ctrl+V.
        // To learn more about selection, visit https://aka.ms/terminal-selection
        { "command": {"action": "copy", "singleLine": false }, "keys": "ctrl+c" },
        { "command": "paste", "keys": "ctrl+v" },

        // Press Ctrl+Shift+F to open the search box
        { "command": "find", "keys": "ctrl+shift+f" },

        // Press Alt+Shift+D to open a new pane.
        // - "split": "auto" makes this pane open in the direction that provides the most surface area.
        // - "splitMode": "duplicate" makes the new pane use the focused pane's profile.
        // To learn more about panes, visit https://aka.ms/terminal-panes
        { "command": { "action": "splitPane", "split": "auto", "splitMode": "duplicate" }, "keys": "alt+shift+d" }
    ]
}


2020年5月23日

試玩 winget tool


微軟在今年的Mircosoft Build上發表了一個可以用來安裝應用程式的命令列工具: winget tool
目前還是preview的winget tool可以在Windows Terminal, PowerShell或是命令提示字元(Command Prompt)下執行

以下操作使用的是: Windows 10(版本 2004/19041.264)繁體中文專業版

首先下載Windows Package Manager Preview版來安裝(winget tool包含在其中)
下載Assets底下的: Microsoft.DesktopAppInstaller_8wekyb3d8bbwe.appxbundle
點兩下就可以安裝:


出現第二個視窗就裝好了, 直接關掉即可

winget tool有開放原始碼, 工具簡介與使用說明 原始碼:

打開PowerShell來測試:


看別人使用好像很簡單, 我就來試試用winget安裝PowerShell 7的穩定版:
winget install powershell 咦, 不行
加個參數看看: winget install -e Powershell 搞定

2020/05/26: 今天發現winget search powershell多了Powershell Core 7.0.0版, 7.0.1版的PowerShell, S變成大寫字母
所以要這樣才能安裝7.0.1版: winget install -e "PowerShell" --id "Microsoft.PowerShell"


接下來換用PowerShell 7操作, 用winget安裝個新版的Microsoft Edge看看:
winget search "Microsoft Edge"
winget install "Microsoft Edge" 果然不行
加參數: winget install -e "Microsoft Edge" 還是不行
加更多參數: winget install -e "Microsoft Edge" --id "Microsoft.Edge" 終於可以了


大亂鬥, 比一下用Invoke-WebRequest下載PowerShell 7後安裝跟用winget tool安裝哪個快: (PowerShell-7.0.1-win-x64.msi 檔案大小約 86.9 MB)
1
2
3
4
5
6
7
$ProgressPreference = 'SilentlyContinue'
Measure-Command -Expression { 
    [Net.ServicePointManager]::SecurityProtocol = [Net.SecurityProtocolType]::Tls12
    $ProgressPreference = 'SilentlyContinue'
    Invoke-WebRequest -UseBasicParsing -Uri https://github.com/PowerShell/PowerShell/releases/download/v7.0.1/PowerShell-7.0.1-win-x64.msi -OutFile "$env:TEMP\PowerShell-7.0.1-win-x64.msi"
    Start-Process "msiexec.exe" -ArgumentList "/package $env:TEMP\PowerShell-7.0.1-win-x64.msi /quiet" -Wait
}


1
2
3
Measure-Command -Expression {
    winget install -e "PowerShell" --id "Microsoft.PowerShell" -h
}


結果用winget tool慢一點 (36.83秒 vs. 39.54秒)

2020/11/01: 調整一些有關winget的設定, 首先用winget settings打開設定檔

(設定檔格式與參數說明: 在此)

改成這樣後存檔:

{
    // For documentation on these settings, see: https://aka.ms/winget-settings
    // "source": {
    //    "autoUpdateIntervalInMinutes": 5
    // },
    "$schema": "https://aka.ms/winget-settings.schema.json",
    "visual": {
        "progressBar": "rainbow"
    },
   "experimentalFeatures": {
       "experimentalCmd": true,
       "experimentalArg": true,
       "experimentalMSStore": true
   }
}

  • Source/autoUpdateIntervalInMinutes: winget更新來源(source)資料的間隔時間 (我用預設值就不改了)
  •  $schema: default schema
  • Visual/progressBar: 安裝軟體時進度條的樣式, 改成彩虹樣式是像這樣:

打開實驗功能 Experimental Features:

  • experimentalCmd
  • experimentalArg
  • experimentalMSStore: 開啟安裝Microsoft Store App的功能

測試一下打開實驗功能後的效果:

  • winget features : 查看實驗功能運行的狀態
  • winget source list : 列出目前的來源
  • winget source update : 更新目前的來源
  • winget search "Windows Terminal" : 搜尋"Windows Terminal" (所有來源)
  • winget search "Windows Terminal" -s msstore : 搜尋"Windows Terminal" (只限Microsoft Store)
  • winget install "Windows Terminal" -s msstore : 從Microsoft Store安裝"Windows Terminal" (目前需要先登入Microsoft Store才可以下載安裝)
  • winget install "Windows Terminal" -s winget : 改從winget-pkgs安裝"Windows Terminal"
 
  •  如果有登入Microsoft Store, winget install "Windows Terminal" -s msstore :


版權宣告

Creative Commons License
本著作由 PROLIANTAHOLIC 製作,以創用CC 姓名標示-非商業性-禁止改作 3.0 台灣 授權條款釋出。
文內所述之產品和公司名稱均為其各自擁有者的商標及(或)服務標記。